Sunday, October 6, 2013

Cupcake Toppers for Christmas Part 2


This is a continuation of my previous POST on Christmas toppers for your cupcakes or cakes. This time I will be using a silicone mould.

Here are the things you will be needing: 
1. Colored gumpaste 
2. Crisco or any vegetable shortening 
3. Small artist's brush
4. Cutting mat 
5. Black food writer 
6. Small ball tool. 
7. Silicone Mould.


With a small brush, dab a little shortening into the cavity. This will prevent the gumpaste or fondant (50/50 or 60/40 ratio of gumpaste to fondant) from sticking in the mould.

 
For SANTA, start with his mustache. Take a tiny amount of White gumpaste/fondant just enough that will fit in the mustache mould. Second, take a flesh colored gumpaste/fondant for Santa's lips. Same with the mustache, fill in the tiny cavity with just enough flesh colored gumpaste. Push it in with a dresden tool or the veiner tool.

Next is Santas eyebrow and the white fur of his hat. Again, fill it in with white gumpaste/fondant. Always remember to fill it just enough. If you go over, it will not be a good sight .


Next is Santa's face. With a flesh colored gumpaste/fondant fill in the face cavity.

Fill in the remaining cavity with red for Santa's hat and white for the beard and puffy ball of his hat.

If your fondant/gumpaste is a little tacky, you need to leave it first for a while to dry a bit before you can use it to fill. By doing so, It will be easier to unmold it from the silicone mould.
Always remember when working with gumpaste, it dries fast so you need to work fast. Once the surface dries out, you need to dab a tiny bit of water or gum glue to moisten it so that it will bind with the other components.

Once the gumpaste is ready, unmold the gumpaste. Do not wait for the gumpaste to completely dry before unmolding, it will surely break. Here goes!!!
TADA!!! see Santa's white brow ? I love this mould!

Now for the eyes, you can paint it with black food marker or you can get a tiny black gumpaste and roll it into a ball and stick it in or if you have a black nonpareil you can use them too as Santa's eyes


                                                                     HO! HO! HO!

 
For the Reindeer...


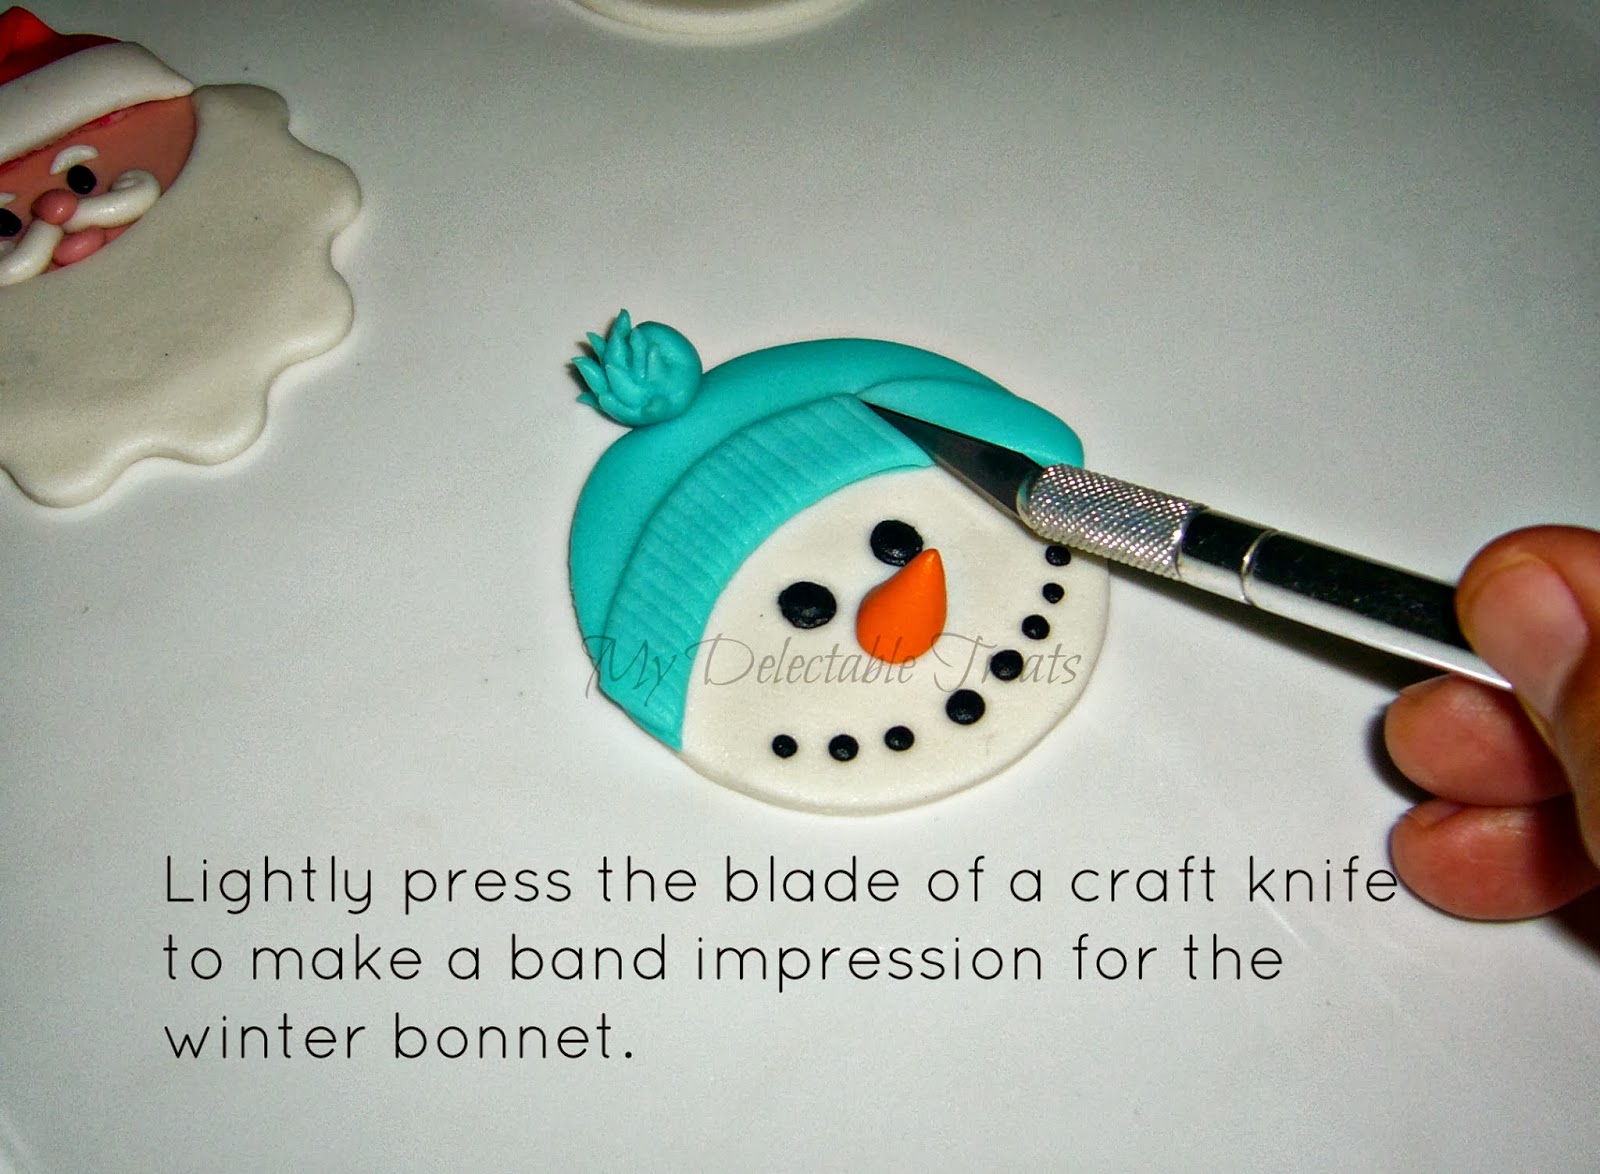
TADA!! I wasn't able to make the snowman. It was too time consuming because of the tiny parts.

Hope you all enjoyed it.

Until next time :)
Donna

Wednesday, October 2, 2013

Cupcake Toppers for Christmas Part 1


I know it is still early to think of Christmas but can't help myself getting excited since I'm really looking forward to see my family again. 

Last year, I made some cupcakes as gifts for Christmas and sold some. Since there were not much cupcake toppers available in our area (that I liked :D ), I decided to make my own. I got the inspirations from the internet. I used some simple cutters and a silicone mould that I got from Bake et al, an online shop for all your cake decorating needs!. I will make a separate blog for the silicone mold. 


So, here goes! You will need the following:


I wanted to make Santa's beard stand out so, I colored my marshmallow fondant with Americolor Bright White.


Hope you could see the difference. Can you?


To start. Roll out a skin toned fondant thinly. Here, I used the biggest cutter from the round and wavy edge double sided cutter set. If your fondant is still tacky and soft, leave it a while before moving it to avoid stretching it. When it's firm, use a pallet knife (I used #1007) to lift it and placed on my work mat. Set aside.


With the wavy edge of the cutter, cut white fondant. this will be Santa's beard. Use the round edge to cut other parts "band", #10 or #12 round piping tip for Santa's hat.


Mustache, Lip and Beard.


Santa's Hat. If the fondant shrunk or short in height, carefully roll it out with a rolling pin to make it longer. As you can see Santa already looked cute even if he's bald :)


Attach remaining parts. You can leave the band as is or cut the sides for a different look. It's up to you  :)


Now the Snowman head with earmuffs 


If the band is thick, you can always trim it down to desired width. Same goes with the ear muffs.


Attach remaining parts. And Tada!


Snowman #2 with winter bonnet.


Using the same cutter used on Santa's face, cut through...

Use the same round cutter to cut and shape the other parts of the bonnet.


NOTES:

1. For this project, I used a marshmallow fondant (MMF) with fondant improver to stabilize the shape of my toppers. I prefer to use MMF because it tastes better than rolled fondant. You may use tylose powder just make sure to knead the sugar dough properly so the tylose powder will completely dissolved.  You can also make these by using gumpaste.

2. Do not refrigerate the toppers with the cupcakes. Place them on your cupcakes as soon as the buttercream comes at room temperature.   


Hope you learned something and ENJOY! 

Donna

Sunday, September 22, 2013

One of the Philippine's most loved dessert: Crema de Fruta


 This is the classic look of a Crema de Fruta.      Photo courtesy of LatestRecipes.net
 
Crema de Fruta, which translates to "fruit cream", is a Filipino dessert that comprises  of a cake, pastry cream, canned fruit cocktail and gelatin. This dessert is usually served during Christmas Holidays, and other special celebrations like Birthdays, Anniversaries, Homecomings, etc. The term and the composition of the dessert may have "foreign" influences but this dessert is a 100% Filipino concoction. Why? because you cannot find anywhere else in the world like it. The Italians have Tiramisu, The English have Trifle, In the USA they have American icebox cake and from the Land Down Under, they have the Australian zebra cake. Spain may have their custard-fruit dessert similar to ours but they love to have their cake/lady fingers soaked with liquor which for most of the Filipinos are not accustomed of. Our desserts are "wholesome", we serve it for everybody to enjoy including the little ones. It would be the cook's, a Lola's or mom's pride to see and hear the Ohhs!, Ahhs!, Ang sarap!, the delight it brought to the ones who ate them! and would like to have more and a BH [which means Bring Home: bring some of the dessert home] :D.  That's one way for us Filipinos to show our love and hospitality to our families and guests.

There are several variations in our Crema de Fruta. Long before All-purpose cream was invented and readily available to consumers, we used the pastry cream to have the creamy goodness of the dessert. Then the canned cream and All-purpose cream came. This has led to innovations in preparing this dessert. Making the custard cream takes time and patience. So, the introduction of the canned cream makes it convenient for busy moms to prepare this dessert. With these innovation, the convenient version of making Crema de Fruta is now called refrigerator cake where, cream, condensed milk are combined to make the sweetened cream mixture. And make it as the filling between layers of graham crackers, broas, and top with fruits of choice. It openened a whole new array of no baked desserts.  Like: Mango Float, Cookies and Cream, Peaches and Cream, Fiesta Icebox cake, etc..

Last week, I got an invitation for a gathering from my elder friend who was celebrating her 75th Birthday. I wanted to make her a cake that she can enjoy eating without worrying much of the calories and amount of sugar in the dessert. A fondant covered cake was definitely not on the list because, it's too sugary for her age and it sometimes hurt me to see people peeling away the marshmallow fondant from the cake, which I worked hard to smooth and decorate. Chocolate has been the choice for the longest time and to me it has become boring :P. I wanted something new, something my friend will truly appreciate. And so, I thought of the Crema de Fruta.To make it extra special, I used peaches, cherries and kiwis and added some chocolate coated broas around the cake and secure it with a ribbon. I wanted her to have the cake for herself so I made some in cupcakes for the guest to taste and enjoy.


With patience and determination you can surely recreate this dessert. Study the recipe first and prepare the necessary tools and ingredients that you will need. It is very important that you understand what you are doing. especially if you're baking your cake from scratch and for the first time.

Here is how:

The Cake:

          I used the American Sponge Cake recipe from  Stephanie Jaworski author of thejoyofbaking.com. This is my go-to site for delicious recipes. Just follow how to make them. She has a video tutorial on this so, this will just be easy for you. If you do not have the time to bake, you can always buy a chiffon cake, sponge cake or Broas (lady fingers) from a bakery or from your leading grocery stores in your area. 

If you plan to place it on a deep dish or rectangular pan/glass container, Cut cake into size. The container should be at least 3-4 inches deep. depends on you if you would like to have it in double layers or single.

Pastry Cream Filling:
         

2 1/2 cups fresh milk

1 cup white sugar

6 egg yolks

1/3 cup cornstarch


To make the Pastry Cream


1. In a big bowl, mix together the yolks and cornstarch until free of lumps and set aside.

2. In a heat proof bowl or heavy bottomed casserole, combine fresh milk and sugar and cook over a pot of simmering water. Cook mixture with constant stirring using a wire whisk. Cook just before it boils. You will see smoke coming out from the sides. Do not let it boil or your pastry cream will curdle and will form lumps. Remove from heat and set aside for a while.

3. Stir yolks and cornstarch mixture and pour in 1/4 of the hot pastry cream. Stir as you add the hot mixture. Mix thoroughly then add the remaining pastry cream. Bring it back to the simmering water and continue to mix thoroughly until creamy.
4. Let it cool completely before using.

Yields around 2 1/4 cups enough to fill and cover 9-inch round/square cake. 


Prepare Assorted Fruits:  

Kiwi (should be firm to the touch), 

canned peaches (reserve the syrup)
bottled cherries. 
strawberries if available
seedless grapes if available 

You can also use mangoes instead of the peaches but make sure they're sweet and dip into a water and calamansi/lemon mixture to prevent it from browning.


Once the cake, pastry cream and fruits are ready you can now start assembling. 


1. Cut the cake into two.
2. Spread some of the pastry cream and arrange some fruits at random. You can put as many as you like. Keeping in mind that you still need to decorate the top.
3. Place the other half of the cake on top. Press lightly and spread the remaining pastry cream on top and sides of the cake. If using a deep dish, divide the cream into two. Pour half on the first cake then just pour the remaining pastry cream on top.


 4. Level, smooth the pastry cream. Arrange the fruits as neatly as possible. When done, set aside.
5. Prepare 250 grams chopped chocolate and melt the chocolate over a double boiler. When completely melted remove from the bath and set aside to cool a bit.
6. While waiting for the chocolate to cool, lay-out the number of broas/lady fingers needed to cover the cake.
7. Dip each broas into the melted chocolate. Remove excess chocolate and lay it on a waxed paper to set. You can also pop it in the fridge to set it faster. Repeat to all Broas.
8. Once the chocolate has set, attach them around the cake. Secure with a ribbon.

GELATINE:

 1 box (90g) of ALSA Gulaman unflavored gelatine. cook according to package instructions. Instead of using water, substitute it with the reserved syrup from the canned peaches.

When melted, brush the arranged fruits with the gelatine mixture using a silicon brush. Make sure all of the fruits are coated. This will preserve the fruits from wilting and oxidizing. 

If using a deep dish, make sure first that the cake was properly sealed with the pastry cream. We don't want the gelatine seeping through the cake. Pour the warm mixture on the fruits making sure that the fruits are covered with gelatine. Refrigerate for at least 2 hours before serving.

There you have it! :)


Here's another version I made for my husband's birthday :)


And this one was on New Year's Eve last 2009. Clearly the dish I used here was not deep enough. Learned the lesson the hard way :D


With the coming Holidays, surprise your love ones with this! you have 3 months to practice :) 

Until Next time!

Donna