Saturday, August 10, 2013

How to make wired Sugar Succulents

Remember my last post ? here's the continuation... As promised, Here's how I made the sugar succulents.

You will be needing:

1.  Colored gumpaste. For this project I had colored it mint green with a little moss green. Let the colored gumpaste rest before using.
2.  Floral wires gauge # 22 and # 26, cut into four inches long. (gauge # may vary depending on the  size and thickness of your leaf)
3.  Teardrop or rose cutters. I know you are wondering why my cutter looks odd :D it is because it is an ice cream on a cone cutter. My teardrop cutters are way too big for the size I am going to make. So, I made used of what I have. You'll see later.
4.  Petal Dust: Moss Green and Old Rose.
5.  Ball tool.
6.  Flat medium stiff bristle paint brush.
7. Cutting Mat.
8.  Rolling pin
9.  Sharp Craft Knife (not in photo)
10. Foam pad (not in photo)
11. Gum glue (not in photo)
12. Styrofoam block, flower formers, drying rack. (not in photo)
13. Vegetable shortening (not in photo) - used to prevent gumpaste from sticking on cutting mat, rolling pin and from the ball tool.
14. Floral Tape  (not in photo)
15. Pearl Luster dust (not in photo)


So, let's get started!

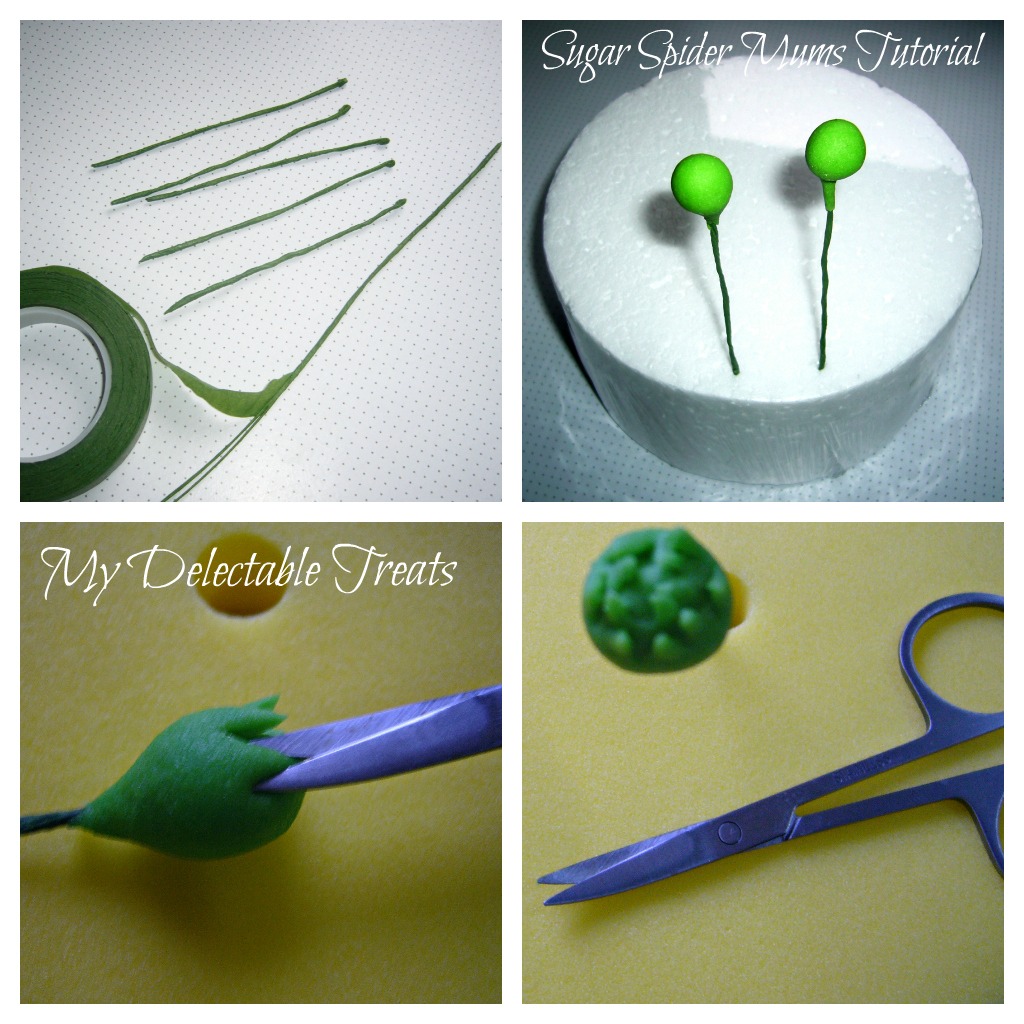
1.  We will start with the bud. Roll out a small ball about 2 grams of gumpaste. If you don't have a weighing scale, you can eye ball the size depending on how small or big you wanted to create. Another method is by using a circle template that you can purchase in your local craft store or school and office supplies store. Just roll a ball of gumpaste and let it sit through the size of the hole you wanted. Making sure that the ball sits snugly half way through the hole.
 

2. For the bud, I used the floral wire gauge #22. With a pliers, bend one end to form a hook. Dip that end into water or gum glue. Thread the other end into the ball until the hook is secured in the ball.
Please keep in mind that the size of the first four leaves should be big enough to wrap around the ball.

3. Let it dry. Drying time varies depending on the weather and the area you are working or where you are placing your buds to dry. Always keep it away from humidity. It is also important that the bud is completely dry when working on the next step which is attaching the leaves.

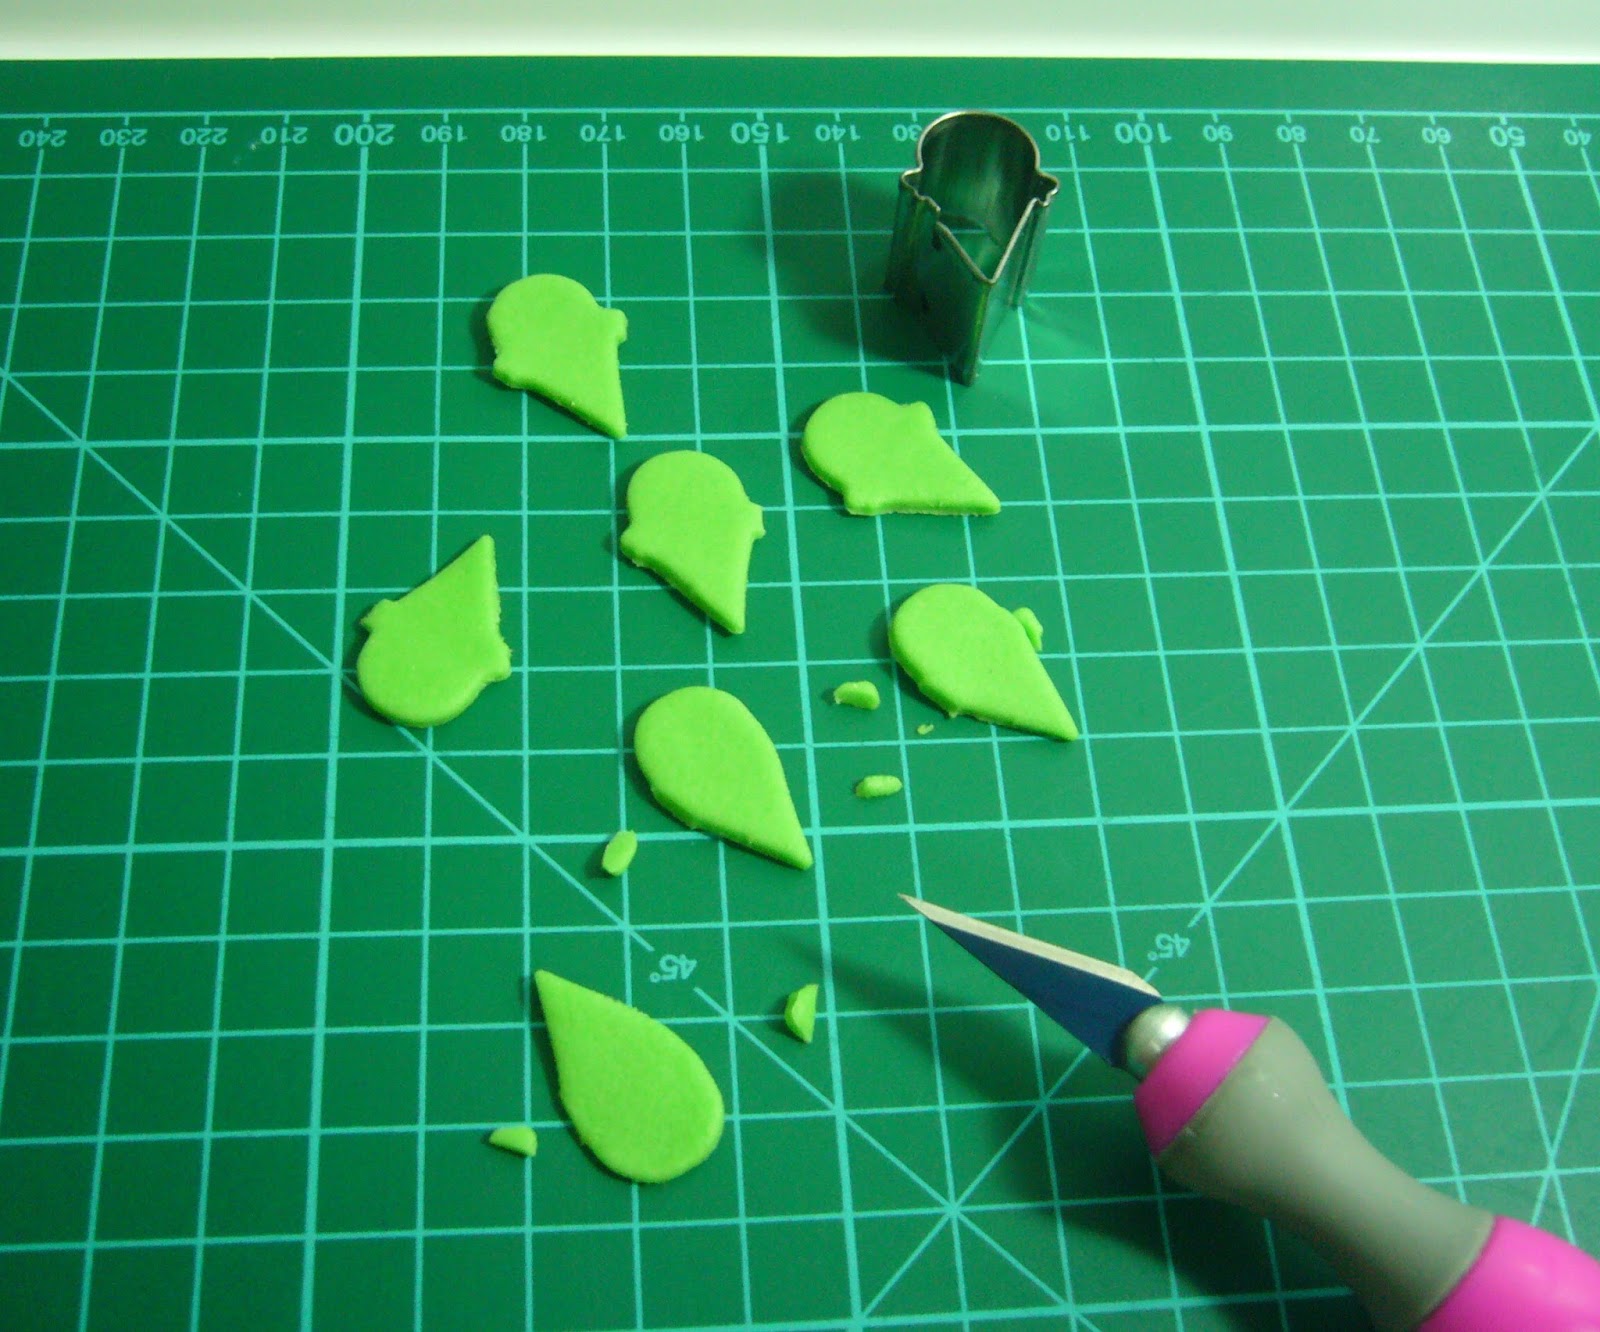
4. Succulents are known to have fat/thick leaves. So we need to roll the gumpaste into an eighth of an inch thick. If you have a rolling pin rings, that will do the job easier to have an even thickness. For the Wilton rolling pin rings, use the purple ones.

Once rolled, I used the smallest cutter that I have to cut the first four leaves to cover the ball to make the bud. Since I'm using an ice cream on a cone cutter, I have to trim out the sides to make a clean teardrop shape.

 5.  Place the teardrop shaped gumpaste onto a foam pad and make an indentation using a ball tool so it will cupped perfectly with the ball. Dab some gum glue and stick it to the ball. Repeat with the remaining three leaves.

6. After all the four leaves are attached, gather the tips of the leaves and twist it to create a spiral look. Set it aside to dry. I forgot to take a photo before this was dusted :D

7. For the leaves, cut another four leaves, same size used in making the bud. Make an indentation again and stick it on the side of the bud with a dab of gum glue.This time let the pointed end upright. Pinch the ends to make a pointy end. Hang it to dry on a drying rack or stick the wire on a foam block. When it dries, dab some old rose petal dust on the pointy ends and sides of the bud and dust the the rest of the bud with moss green petal dust. Set aside.


8. For the next set of leaves you need to cut ten to twelve leaves (depending on the size of your bud).  Once cut and trimmed, place your left thumb on the edge of the wide part of the leaf. Gently push it towards your two right fingers, while doing so, pinch until you get the center pointy.


9. Lay it on the foam pad. With a ball tool, starting at the middle, run it through just before the edge of the leaf. Do the same to the other side.

10. To have a nice cupped and wide look, pinch the sides of the leaf like in the photo.


11. Once you get the desired shape, you can get the floral wire gauge #26. Dip it in gum glue and thread it through the end of the pointed part of the leaf. Lay it on flower formers to dry. Do the same to the remaining eleven leaves. If you want a fuller look, just use the next large size of your cutter and make more leaves.


12. Once the leaves are dried, dust the pointed part first with old rose petal dust and the sides near the point before dusting the rest of the leaf with moss green petal dust.

13.  Holding the tip of the the leaf, bend the wire down. This will make attaching to the bud's stem easier.


14. To attach the leaf, wrap both wires (from the bud and the leaf) with a floral tape. Wrap every wire to the tip before attaching another. Continue until all leaves are attached.

15. See how lovely it is as it starts to take shape :)


You can now dust it with a pearl luster dust to give it life! And here they are ... before they were wrapped and placed in the cake box.


You can vary the sizes and number of leaves to give it character and variations on your sugar succulents.

Have a great day everyone! Until next time.


Donna 


Wednesday, August 7, 2013

My Sweet Succulent Adventure


It has been two years since I fell in love with  moulding sugar figures and flowers. It has totally opened a new world for me to explore and has rekindled my love for art. I have never imagined for an edible play-dough like sugar paste could create wonders in decorating a cake. I love making sugar flowers, I’m more comfortable making them than human figures but I am already working on in improving my skills.

Recently, I got the opportunity to work with a friend-baker Kristine with her wedding cake project. It was a massive, well for me it is since I haven’t worked on that big of a size cake yet, 5-tier, six inch-height per layer cake. The bride-to-be requested for lace, succulents and peony [pronounced as pee’-uh-knee] elements as the main decors of her wedding cake. 

And so I was tasked to make the sugar succulents and the sugar peonies. I have found a few tutorials online on how to make them but it doesn’t fit the size requirement needed on the cake. I needed it to be at least 3 to 4-inches in diameter. After spending sometime on photos of the infamous succulents, I have decided to make it like an open flower (which some specie do looks like). To do so, I needed to wire them and bunch the wires. I will make another post on how to make these succulents. . 

Allow me to share my friend’s work. It’s humongous isn’t it?  More than enough to feed 400 guests! I am very pleased with how it turned out. Kristine really did a very good job in staging the sugar flowers and succulents. She also did the cupcake toppers! the dainty pattern fit perfectly which is cohesive with the lace pattern around each tier of the cake. 

We, we?, really we? or was it just me?! I! was very anxious with how the bride will react. But all our hard work and sleepless nights paid off when the Bride and Groom congratulated Kristine that they were very pleased and happy with how the cake turned out. Not only them, so as the bridal party and the guests loved the cake!

Thank you very much for the opportunity of working with you Kristine :) I had fun!


Photos courtesy of Ms. Kristine Grace Santos.
 

How to make Green Spider Mums Sugar Flower


Spider mums belongs to the chrysanthemum family. They are also known as football mums in the United States. Here in our country, most of the people doesn't know what it's called since it is not grown here. These flowers are imported in our country. 

 I've always been fascinated with this flower. They always exudes elegance and joy on flower arrangements. And thought that it would also do the same on cakes. This sugar flower is easy to make. Most of the techniques I've used here are also been used in making other sugar flowers.  So, I hope you will enjoy making them as much as I did.


To start, here are the things needed to make this flower. 


Colored gumpaste  - I find that using gumpaste for sugar flowers  worked best for this project . Gumpaste was tinted with mint green+yellow gel food colors.

Daisy cutters (generic plungers or PME)    
Ball tool       
Veiner tool          
Leaf / Dresden modelling tool                      
Pliers            
Sharp craft knife          
Rolling pin                                                    
Foam pad        
Scissors             
Cutting mat               
Florist wires gauge #20 or #22         
Floral tape            
Water or edible glue  
clean small paint brush (new)
Never-been-used egg carton and Flower formers


This flower is heavy. Therefore, you need a thick wire to support its weight. Since I don't have a #20 gauge Florist wire at hand, I made used of 4 #22 gauge floral wires and wrap it with a green floral tape. Make a loop on one end and set aside. 


Make a small ball of green gumpaste to make a bud and, inset floral wire. With a small scissors, Snip half way thru gumpaste to create the flower's bud features. Set aside and let it dry. Also when you’re drying your sugar flowers and buds, do not leave them exposed to humidity. The sugar flowers will not dry. Instead, it will soften and sometimes becomes mushy or melted. What you can do is place your sugar flowers and buds in a controlled area, it could be a cupboard, or a clean corrugated box with a dehumidifier or desiccant packets. This way you can keep moisture at bay.
 
When the bud has dried, roll out gumpaste  about  four  millimeter thick. Cut out six daisy petals, choose a size that will cover 3/4 of your bud. Cut each petal into two. Thin down petals if needed by rolling it out with a rolling pin. To create the cupped/curled look of the petals, use the leaf tool and apply pressure from the tip of the petal down to the base. Repeat to all petals.

Dab a small amount of edible glue and thread it through the wire and attach it on the dried bud.  For the first two petals, stick it half way through the bud. Arrange petals, pinch lightly. Hang it upside down as you worked on the other petals. Once the remaining four petals are curled, dab a little water and again, thread it through the wire and attach it on the prepared bud. Arrange the petals, pinch lightly. Let it dry upside down or thread it through on the egg carton preferably the paper ones. I found out that it dries more quickly on them than the styro type.


Using the next larger size, Cut another  four daisy flowers. Cut each petal into 2 and this time use the veiner tool. Run it through the petal starting from the tip down to the base. Be careful not to push too hard or your petals will tear. Don't worry if you lost a petal or two, it will be concealed by the next petal


For the last set of petals, you need a larger cutter . If you don't have one :) don't worry, just use the previous cutter you used and thin it out using your ball tool to stretch out each petal. Again, cut it into 2 and do the same just like the second batch of flowers. Dry flowers either by hanging it on a drying rack or on a flower former. Or you may improvise by using a crumpled foil and lay it on an egg carton.


Here's an example of an improvised flower former using aluminium foil and an egg carton.


A closer look of the finished Spider Mum. For a fuller look, You may add more petals (bigger in size than the last set of petals)


Notes and Tips:

.       1.  For the Bud, I find it easier to use the angled scissors in snipping the gumpaste as it naturally cut the curves needed for the curled effect. 
         2.  It is important that the bud is completely dried from inside out before attaching the petals. Drying time depends on the size of your ball and the weather in your area. If it’s raining and humid it will take 5 days to a week . If it’s hot and sunny, it will take 2 days, 3 days at the most.
3      3.  When using aluminium foil as flower formers, the bottom will not dry together with the top. There’s no air circulating underneath that will aid in drying the gumpaste. What you can do is after drying the sugar flower overnight, you can transfer it to the egg carton with crumpled paper towels in the bottom to support and retain the form of the petals. Also you can use the crumpled wax papers or parchment paper. Just make sure that the bottom of your sugar flower is not wet and or have excess  gumglue or the paper will stick onto the sugar flower and it would be difficult to remove it once the gumpaste is dried. Also, the petals are thin and is delicate when fully dried.

You can view more photos of the flower on my Facebook page


Enjoy :)

Donna